BehaviourComposer: ignore everything before this.
Guide to modelling predator-prey systems
This guide will help you build a model of a simple ecosystem consisting of predators, prey, and plants using the BehaviourComposer. The guide includes links to all the micro-behaviours needed to construct the model. You can use the full library of micro-behaviours to further enhance your model.
Many prefer to split this window with the rest of the Behaviour Composer. To do so check the box labeled 'Split screen between this panel and everything else.' at the bottom of this page.
Create a prototypical predator
In this step you simply learn the basic action of adding micro-behaviours to your agent prototypes. (If you get stuck please ask).
- Rename Prototype1 to Wolf by navigating to the Composer Area and clicking on Prototype1 and selecting the Rename option.
- To set the shape of the wolf prototype go to the Shape micro-behaviour, replace 'fish' with one of the supported shapes (e.g. 'wolf 2' -- note that the space between the 'f' and the '2' is required) and then click on the 'Shape' micro-behaviour button and select Add it to your prototype. You will be taken back to the composer area where you can drop this micro-behaviour on your Wolf prototype.
- Open Color and edit the colour. Add it to your prototype.
- Depending upon how you are running the Behaviour Composer:
- Click on the Run tab and wait for the model to load
- Click on the Download tab and then click on the link to download the model and run it in the NetLogo app.
- Click on the SETUP button to see your predator.
Create a prototypical prey
Now do the same but to create a prey agent.
- Click on New Prototype in the the Composer Area. Rename Prototype2 to Sheep.
- Repeat step 1.2 with a different shape.
- Repeat step 1.3. to set the color of your prey
- Click on the Run or Download tab and then the SETUP button.
- The location of the prototypes wasn't specified so they both begin in the centre on top of each other. Add Jump to unoccupied location to both to fix this.
- Run your model.
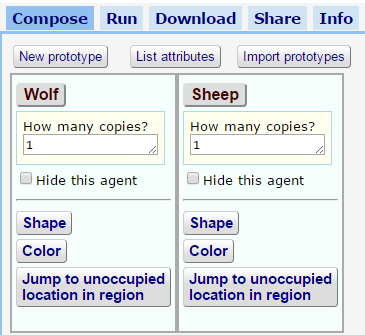
You should end up with your Composer Build tab looking something like this:
Create an environment
To make it easier to see your agents we'll change the colour of the patches.
- Create another Prototype and Rename it World.
- Add Color of all patches to the World prototype. Keep the colour as green since later that will represent grass.
- Check the box labelled Hide this agent so you don't see its default shape when running your model.
- Run the model again.
Make the predators and prey move
We are planning on having interactions between agents occur when they occupy the same space. At least one kind of agent needs to move to enable these interactions. They could move in a goal-directed manner but for simplicity we will make them all wander randomly.
- Add Forward repeatedly and Turn repeatedly randomly to the predator and prey agents. With these behaviours they will turn randomly and move forward a constant amount each time step.
- Run your model.
- You can change the speed the simulation runs using the slider at the top of the view.
- Initially all the agents are headed upward. To start them off heading in different directions add Random heading to both predators and prey.
Make many predators and prey
Now create more of each of your prototypical predator and prey agents.
- In the composer area edit the text area above 'How many copies?' of the predator and prey prototypes to a larger number e.g. 10.
- Run your model.
Model the eating of prey by predators
To model predation we will have each predator eat one of the prey at the same patch of the environment (if there is one). For simplicity we will have the predators do this on every tick of the simulated clock. If we think of patches as fairly large and clock ticks as several days this isn't so unrealistic. We will model eating as the death of the prey and later will model the acquisition of energy as the result of eating.
- Open Interact with another and rename it to Eat sheep.
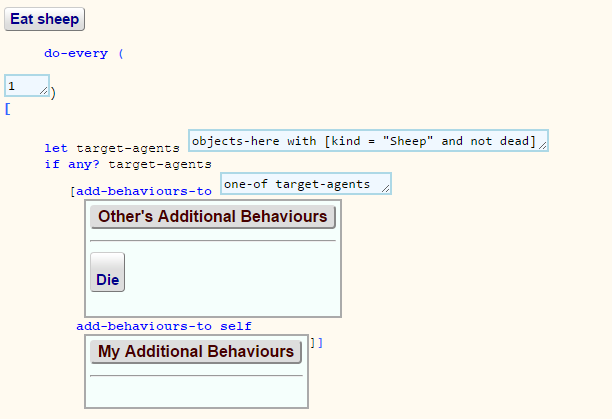
- Replace the contents of the first text area with objects-here with [kind = "Sheep" and not dead] (i.e., all agents at this patch that are sheep and not dead).
- Open Die and add it to the list of Other's Additional Behaviours in Eat sheep.
- We now have a behaviour that randomly picks one prey at the patch the predator is occupying (if there is one) and adds the Die behaviour to the prey. To cause Eat sheep to run on every tick click on the button and select Enhance followed by Do Repeatedly.
- Here's how Eat sheep should look:
- Add Eat sheep to your Wolf prototype.
Model energy collection and consumption
We can model energy by giving predators an attribute called 'my-energy' which stores the value of how much energy the predator has at each time unit of the simulation.
- First let's give the wolves different amounts of energy at the start of the simulation. Edit Set attribute so that the first text boxes defines an attribute named 'my-energy'. (The BehaviourComposer automates the task of declaring attributes if their name begins with "my-".) To give predators different amounts of initial energy the initial value can be an expression such as random-integer-between 1 40
- Rename it and add it to Wolf. It should look something like this:
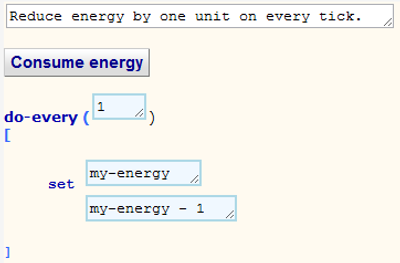
- Next we'll define a behaviour that will model the constant decrease in energy. Customise Set attribute so that my-energy is set to my-energy - 1. In other words change the value of 'my-energy' to be its current value minus one. (Note that NetLogo requires spaces on both sides of the minus sign.) Rename it to Consume energy. To cause this behaviour to run on every tick click on the button and select Enhance followed by Do Repeatedly. Add it to Wolf. It should look like this:
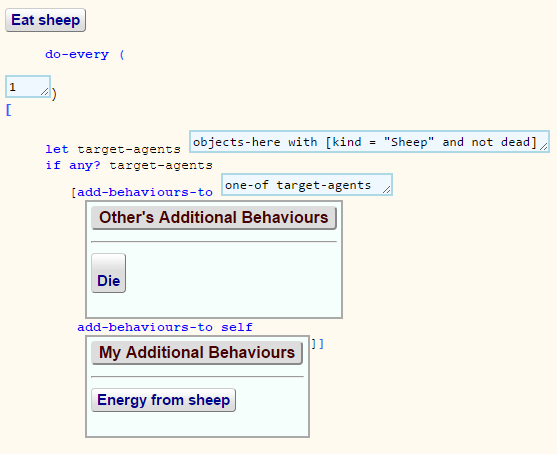
- Now we'll model the gain in energy a wolf would get after eating prey. Customise Set attribute again to specify that my-energy is set to my-energy + 20. Add this micro-behaviour to the My Additional Behaviours list in the Eat sheep behaviour so that this code will run whenever a wolf eats a sheep. Eat sheep should now look like this:
- Finally, let's model the event where wolves have no energy and so they die. Open this fresh copy of Die and rename it to Die when no energy. Select Enhance and Do Whenever. Replace the condition with my-energy <= 0 and time > 0 (i.e. if the energy is less than or equal to zero and the simulation has started).
- Run your model a few times to see if predators and prey survive.
Draw population graphs as the model unfolds
It can be hard to see exactly how the simulation is changing by just observing it running in the applet view. We can add graphs to help us analyse the system more rigorously.
- Create another new prototype and rename it to Observer. Check the box labelled Hide this agent so you don't see its default shape when running your model.
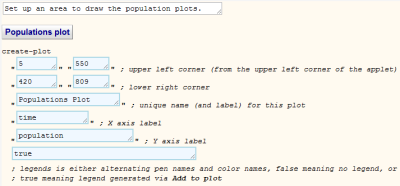
- Now open Create empty auto plot, change the plot name (the fifth box) to
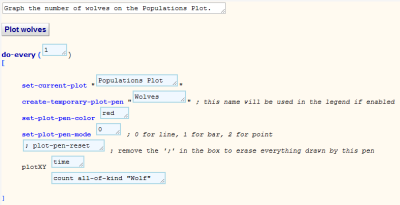
Populations Plot, the y-axis label to population, and the legends field to true. Add the micro-behaviour to the Observer prototype. - Open Add to Plot, edit it as follows, and add to the Observer prototype.
- Do the same to plot the sheep population. Use blue as the pen colour.
- Run your model.
Model predator reproduction
A very simple way to model reproduction is that each individual reproduces with some odds on each time step. (We will ignore gender, sexual maturity, and sexual encounters at this stage in our modelling).
- Open Add copies and change the 9 to 1. Rename the behaviour to Add a child.
- We will split the energy between the parent and offspring. To do so edit and rename Set attribute. (Split energy is a good name.) Specify that my-energy is set to my-energy / 2 (note that NetLogo requires spaces on both sides of the /).
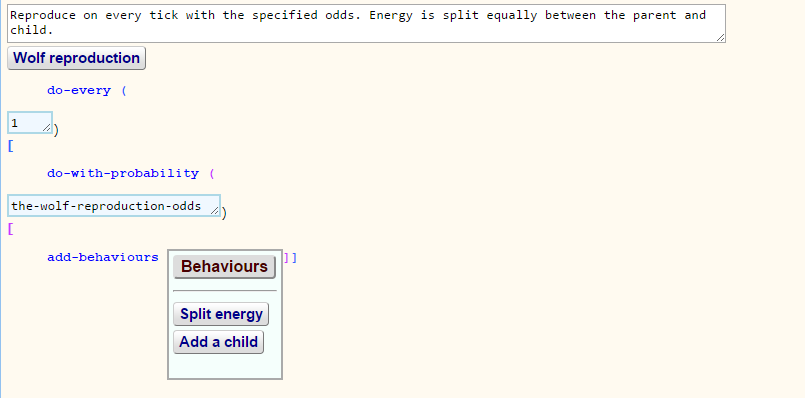
- Open Add behaviours and rename it to Wolf reproduction.
- Add the Add a child behaviour to the Behaviours list on the Wolf reproduction behaviour.
- Add the Split energy behaviour to the Behaviours list on Wolf reproduction. It is important the energy is halved before the agent is copied so that the copy also gets half the energy so be sure that the Split energy is above Add a child.
- Click on the Wolf reproduction button and select Enhance followed by Do with Probability.
- Edit the probability field to a small value (0.02 for example to model a 2% chance of reproducing on each turn).
- Click on the Wolf reproduction button and select Enhance followed by Do Repeatedly so this behaviour happens on every simulation cycle.
- Wolf reproduction should look like this:
- Add Wolf reproduction to Wolf.
- Run your model.
Model prey reproduction
Do the same as step 9 possibly with a different probability or parameter. You can reuse the behaviours by adding Wolf reproduction to Sheep and editing the resulting micro-behaviour copy.
Model vegetation
We can introduce plants that the prey eats. Eating entails gaining energy and setting the grass brown. After being eaten plants replenish themselves after a delay.
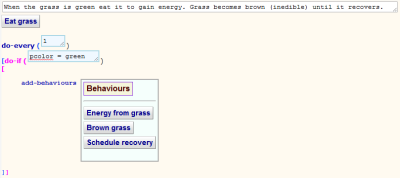
- Open Add Behaviours. Click Enhance then Do Conditionally and replace the condition with
pcolor = green (i.e., ask if the color of the patch is green). Select Enhance followed by Do Repeatedly. Rename it to Eat grass. - Open Set Attribute and edit it to set
- Rename it to Energy from grass. Add it to the list of behaviours in Eat grass.
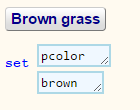
- Open Set Attribute and edit it to
Rename it to Brown grass. Add it to the list of behaviours in Eat grass. (Brown grass is inedible because the condition of Eat Grass is that the color is green.)
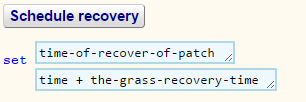
- Open Set Attribute and edit it to
Rename it to Schedule recovery. Add it to the list of behaviours in Eat grass. Note that without the next steps this will not cause the grass to become green again.
Open Set Attribute and edit it to set the-grass-recovery-time to a value of your choice. Or use Define Parameter to create a slider for this variable. - Check that Eat grass looks like this:
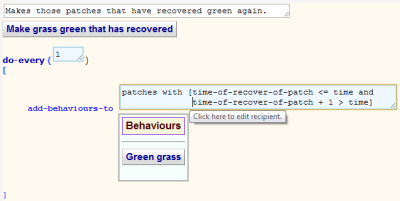
- Open Add behaviours to and replace the text area with patches with [time-of-recovery-of-patch <= time and time-of-recovery-of-patch + 1 > time] (i.e. those patches whose recovery time has just occurred). Select Enhance followed by Do Repeatedly. Rename it to Make grass green that has recovered.
- Open Set Attribute and edit it to
set pcolor green. Rename it to Green grass. Add it to the list of behaviours inMake grass green that has recovered. It should look like this: - Add Make grass green that has recovered to the World prototype.
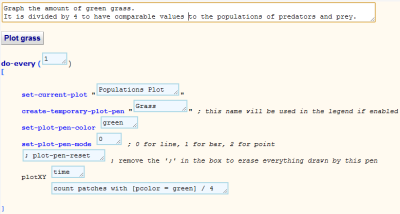
- To plot the amount of grass Open Add to Plot, edit it as follows, and add to the Observer prototype.
Model energy consumption to the prey
- Add a copy of the Initial energy, Consume energy, and Die when no energy behaviours created in Step 7 to Sheep.
- Run your model. Compare the fluctuations of the predator and prey with and without plants.
Going further
If you have time we recommend you use the guide to enhancing the predator prey model to explore enhancements. One changes predators so they are more likely to catch young or old prey. Another introduces a geographical barrier that almost divides the world in two.
Alternatively you may wish to explore this sample predator-prey model that adds sliders for several of the parameters of this model for easy experimentation.
This guide was inspired by the NetLogo Wolf Sheep Predation model.
BehaviourComposer: ignore everything after this.
